... :(
I see my blog has died. I'm very sorry :( It's becoming extremely hard to craft in college, especially for sewing projects as I don't have a sewing machine with me. BUT I did prepare some hats I made ahead of time that only needs the details to be sewn on! I will finish them when I have time (aka after this Orgo test) but there exists another problem...
PICTURES. Yes, that's one of the biggest headaches for me. My photography skills and camera are not the best, and more often than not prevents, rather than encourages, me from posting my creations. I hope I will get out of this one year hiatus and be back with cool crafts! :)
While home during spring break, I also dug out some charms I had made for necklaces ^^ Hopefully you'll be able to see them in a few months when I go back home again :)
Until then, I leave you with a promise that a new entry featuring a craft will be written up and posted in 2 weeks!
Sunday, March 24, 2013
Wednesday, July 13, 2011
Resolution: A craft a day!
I finally finished what has kept me from being productive lately... Eyeshield 21!! Kyaaaa >w< Actually, it's my second time reading it. But oh my goodness, the epicness has not faded one bit, this is definitely a top notch manga! I'm itching to draw an Eyeshield 21 cap right now... I need to go to Michael's soon to buy the hat and fabric pens soon. I'm bubbling with excitement at the prospects!
Ah but yes, back to my resolution: a craft a day! Yes, I decided that I will make a craft every single day. It may be simple or complicated, big or small, jewelry or clothes, but every day, I will produce something creative. I started this resolution today- I've already reconstructed a small shirt I've had for a couple years that no longer fits, into a cute sleeveless shrug. I'm afraid I don't have any before pictures... actually, I won't have pictures for two weeks because my mom took my camera with her so I will try to focus on making jewelry instead. But I couldn't resist myself today and went ahead and performed surgery on my shirt. I'm much happier with it now because:
1. I can wear it, finally. (The before sleeves were too small for my shoulders. Now that it's sleeveless, it fits again!)
2. I have a white outerwear to pair with my many dark colored tanktops.
3. It's perfect for layering!
This is a short post, but definitely stay tuned for some cute creations coming! See you later!
2. I have a white outerwear to pair with my many dark colored tanktops.
3. It's perfect for layering!
This is a short post, but definitely stay tuned for some cute creations coming! See you later!
Thursday, July 7, 2011
First food post
I said this blog would be composed of crafts and food. And I finally have something to show for the ladder! :D I've been looking up various non-Asian recipes lately and trying to make them using what we had in the fridge and cupboards... not hard, but not easy either, considering a majority of our spices are Asian. But we did somehow buy tons of corn tortillas so I made chicken enchiladas once! Yay :D

It's made from corn tortillas, chicken pieces with salt and pepper, ground chicken molded into chunks seasoned with ground red pepper, black pepper, and seasoned bread crumbs, avocados, onion, green bell pepper, and tomato and basil sauce.
I also made pineapple upside down cake with canned pineapples and my first attempt was making the cake from scratch. I didn't have baking powder, so I found a recipe with baking soda but... alas, the cake didn't rise and was very dense (but delicious, still). The recipe also called for too much butter and brown sugar... when I took it out of the oven, the butter and brown sugar mixture was still liquid and very wet! :X Next time, if I try making a pineapple upside down cake again from scratch, I think I'll use a recipe with baking powder.

Next we went to an Asian party so I decided to bake two cakes. But I was lazy and didn't feel like making them from scratch, so we went to Walmart and conveniently picked up two pre-made cake mixes ^_^ The first one was red velvet, and the second one was pineapple upside-down cake!

I made the red velvet batch into cupcakes... but I wasn't too impressed with the batter. Sure it did the job, but maybe I overbaked or something because the inside wasn't as moist as I expected it to be. I've tried many cake mixes from this brand, and this was the first mix that wasn't moist and soft, like the others.
Still, I made some cream cheese frosting, put in into a zipblog bag (I'm planning to get a legit frosting pipette soon), and made some swirls. Then decorated each cupcake with a 1/6 of a slice of lemon and orange, and chopped craisins. Delicious, and beautiful.


Anyways, I had bought an actual 9 x 13'' cake pan before baking the cake, seeing as I didn't have one. Therefore, the can of pineapples didn't have enough rings to fill the whole surface of the pan. So I made each ring smaller and filled the spaces with... plums. I was afraid, since they weren't black plums, that the color wouldn't turn out to be pretty but I was wrong- they baked into such a pretty shade of pink and red!

Look at the plums! So beautiful!

And the day before, I baked a quiche for lunch and stuffed breaded chicken breasts and asparagus and bell pepper with sweet balsamic vinegar sauce for dinner. The chicken was stuffed with broccoli, smoked salmon, American cheddar cheese, and mozzarella cheese. Absolutely amazing. I forgot to take a picture of the quiche, but here's the chicken.


I know the quality of the pictures suck, but my camera isn't the best... still, in the future, I plan on having better lighting and presentation!
Until next time :)
Thursday, June 23, 2011
Squid hat tutorial and process
Heyyyy.
So in my last post published 5 seconds ago, I said I'll be making a tutorial on how to make the squid hat. Here it is! I apologize ahead of time for the ridiculous amount of pictures and wordy explanations. And I still don't understand how to post two pictures side by side without resizing them to small. Can someone enlighten me? Now onto the tutorial! The pictures follow each step.
1. I started off using Clearkid's earflap tutorial. I printed out the pattern she has wonderfully provided, folded my fabric in half, and traced the pattern. I drew five tentacles on each earflap, and when the fabric opened, repeated the same process, for a total of ten tentacles spread evenly over two earflaps. The two long tentacles were on either side, with eight tiny tentacles in the middle. Since the inside of the squid was going to be a different color, I traced this design (earflap and tentacles and all) onto a different color (in this case, green), and cut out the two pieces. If you were going to use the same color, simply cut out two pieces of what you just drew, on the same fabric. Or you can be lazy and fold the fabric in half (equal sizes), trace your design, and cut it out once to produce two pieces. Whatever floats your boat. The second option is more foolproof, since it assures you will have two opposite pieces for sewing, when you sew the two pieces good sides together and flip it out. If you go by the first method, make sure when you sew the two pieces good pieces facing each other together, the pieces' shapes match up. Sorry if I don't make sense... I'm always bad with explaining things.

2. After cutting out the pieces and pinning them together, right sides facing each other (so when you turn it out so that the seams won't show, the good sides will be outside!), I sewed the pieces together, being careful to follow my drawing.


3. I then proceeded to cut the tentacles separately (don't cut too close or you might cut your seams!), and flip them inside out by using a pencil to poke the right side through. I then flipped to the yellow side, took the edges and sewed them together. This is so when you flip it so that the green is facing out again, the seams won't show.


4. I then used Clearkid's hat tutorial to make a basic hat to put underneath the green outer layer, in order to keep the stuffing in (we're not at the stuffing point yet, though). But I didn't add the hat band, I only sewed the four pieces of triangles together, because the band (steps 1-3) will be added later on.


5. Now I laid the hat flat on top of the green fabric (or whichever color you choose to be the squid's outer color), and drew a squid like, triangular shape. Making sure the pieces would match when I pin their right sides together, I cut out an identical triangle. You should now have two green triangles resembling a squid's head.


6. Now I cut out the squid's earlike things. I'll just call them ears for reference's sake. Since the squid will have two ears, I cut out four pieces. Just draw whatever design you like, you don't need a pattern for this. You can freehand/wing all of this! I used the folding fabric in half, draw design, and cut method to assure me the pieces will match one they are opposite one another.

7. This step, I forgot to take pictures. But I basically sewed the outer green squid hat together. I pinned the two large triangle pieces, good sides facing each other, together. Then I pinned the two ears, good sides facing OUTWARDS. I took the ears (good sides facing outwards) and pinned them INSIDE the two triangles (good sides facing inwards), near the top of the triangles. If you think about it, when you have sewn everything together and flipped the whole thing inside out, all the good sides would be facing outwards. So then I sewed, and got this shape.

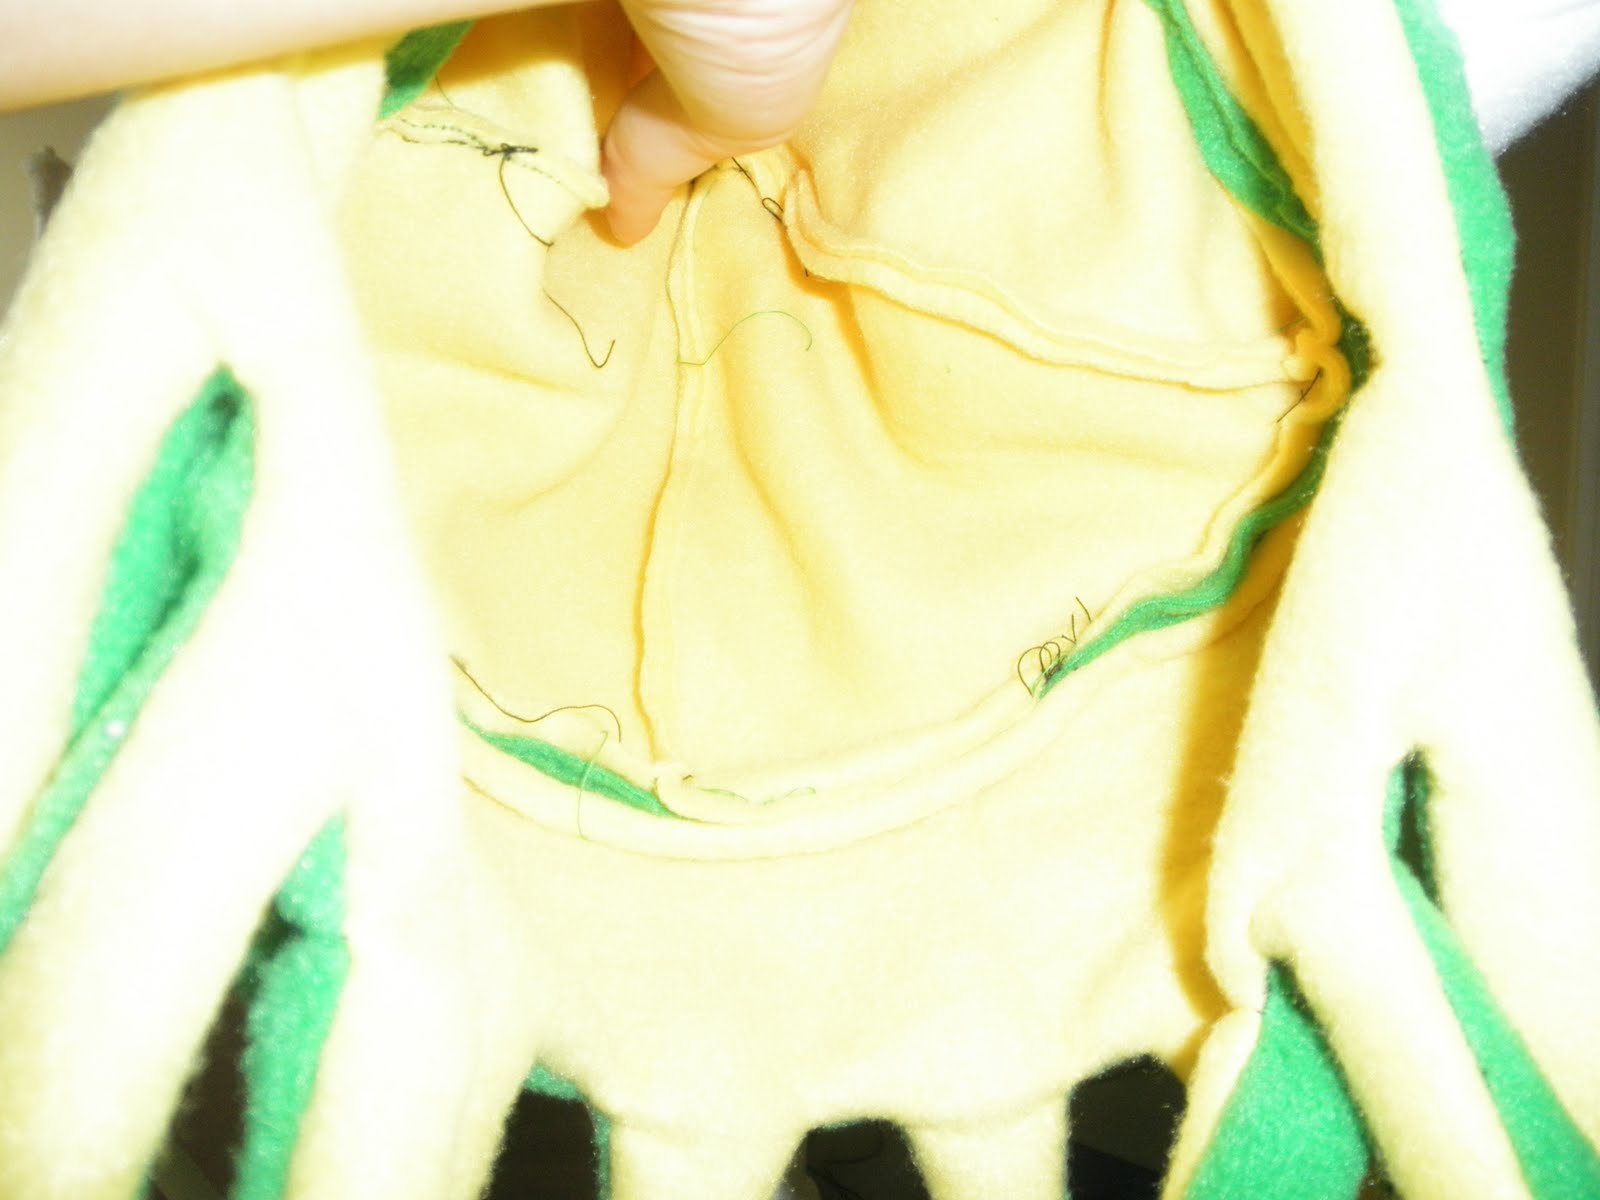
8. Next I pinned the ear flaps onto the hat. Clearkid explained how to do that here, but if you're still having trouble following her tutorial, I shall explain. I flipped the ear flap to the yellow side (the bottom layer of the hat), and pinned it to the green hat with its good side still facing out.

9. I stuffed the hat, then pinned the yellow hat to the inside of the green hat, the good side of the yellow hat touching the bad side (or inside) of the green hat. You can try it on to see if there's enough stuffing. I was satisfied, so I sewed through all the layers and flipped the ear flap down. Tada! Your hat now looks like this.
10. Determining the size of the eyes was tricky... I basically cut out two large circles and the triangles needed to make the eyes (tutorial here), and cut them down to size through trial and error.


11. Then I handsewed the pupils onto the eyes, and the eyes onto the squid after being satisfied with their positions (which means trying on the hat and marking/remembering where the eyes are to go).
12. I then handsewed on some suckers for the two large tentacles, four on each tentacle.

13. For one of the tentacles, I switched one of the suckers for a little pink fish. I sewed a clip on button thing (I don't know what it's called. Anyone have an idea?) to the fish and an extra sucker, so the owner can switch the decorations up from time to time.
Here's the squid tentacle with the sucker, and with the fish.


14. Finally I handsewed some decorations on the squid's head. Circle barnacles are all the rage these days ;) And voila! Finished squid hat.

I made the hat using green antipill fleece and yellow blizzard fleece. The antipill fleece is more expensive, but fuzzier, and I wanted the squid to have two different textures. The black pupils/fish is made from felt, but the eyeball is made of blizzard fleece. The barnacles are also made of blizzard fleece, but that's because I didn't have yellow felt. I usually like to use felt for the details, because it's so much thinner and easier to handsew.
Some more pictures of the details, and the inside of the hat.


And that's that! Thanks for reading, happy sewing! Now go make your own squid hat! x)

So in my last post published 5 seconds ago, I said I'll be making a tutorial on how to make the squid hat. Here it is! I apologize ahead of time for the ridiculous amount of pictures and wordy explanations. And I still don't understand how to post two pictures side by side without resizing them to small. Can someone enlighten me? Now onto the tutorial! The pictures follow each step.
 |
| From the side |
 |
| The end result, front view |
 | |||||||||||||||||
| Back |
1. I started off using Clearkid's earflap tutorial. I printed out the pattern she has wonderfully provided, folded my fabric in half, and traced the pattern. I drew five tentacles on each earflap, and when the fabric opened, repeated the same process, for a total of ten tentacles spread evenly over two earflaps. The two long tentacles were on either side, with eight tiny tentacles in the middle. Since the inside of the squid was going to be a different color, I traced this design (earflap and tentacles and all) onto a different color (in this case, green), and cut out the two pieces. If you were going to use the same color, simply cut out two pieces of what you just drew, on the same fabric. Or you can be lazy and fold the fabric in half (equal sizes), trace your design, and cut it out once to produce two pieces. Whatever floats your boat. The second option is more foolproof, since it assures you will have two opposite pieces for sewing, when you sew the two pieces good sides together and flip it out. If you go by the first method, make sure when you sew the two pieces good pieces facing each other together, the pieces' shapes match up. Sorry if I don't make sense... I'm always bad with explaining things.
 |
| Fold fabric in two, draw pattern |

 | ||
| Details of the spacing |
2. After cutting out the pieces and pinning them together, right sides facing each other (so when you turn it out so that the seams won't show, the good sides will be outside!), I sewed the pieces together, being careful to follow my drawing.


3. I then proceeded to cut the tentacles separately (don't cut too close or you might cut your seams!), and flip them inside out by using a pencil to poke the right side through. I then flipped to the yellow side, took the edges and sewed them together. This is so when you flip it so that the green is facing out again, the seams won't show.


 |
| Pull |
 |
| Poke |
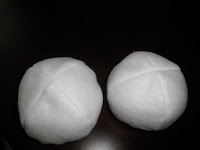
4. I then used Clearkid's hat tutorial to make a basic hat to put underneath the green outer layer, in order to keep the stuffing in (we're not at the stuffing point yet, though). But I didn't add the hat band, I only sewed the four pieces of triangles together, because the band (steps 1-3) will be added later on.


5. Now I laid the hat flat on top of the green fabric (or whichever color you choose to be the squid's outer color), and drew a squid like, triangular shape. Making sure the pieces would match when I pin their right sides together, I cut out an identical triangle. You should now have two green triangles resembling a squid's head.


6. Now I cut out the squid's earlike things. I'll just call them ears for reference's sake. Since the squid will have two ears, I cut out four pieces. Just draw whatever design you like, you don't need a pattern for this. You can freehand/wing all of this! I used the folding fabric in half, draw design, and cut method to assure me the pieces will match one they are opposite one another.

7. This step, I forgot to take pictures. But I basically sewed the outer green squid hat together. I pinned the two large triangle pieces, good sides facing each other, together. Then I pinned the two ears, good sides facing OUTWARDS. I took the ears (good sides facing outwards) and pinned them INSIDE the two triangles (good sides facing inwards), near the top of the triangles. If you think about it, when you have sewn everything together and flipped the whole thing inside out, all the good sides would be facing outwards. So then I sewed, and got this shape.

8. Next I pinned the ear flaps onto the hat. Clearkid explained how to do that here, but if you're still having trouble following her tutorial, I shall explain. I flipped the ear flap to the yellow side (the bottom layer of the hat), and pinned it to the green hat with its good side still facing out.

9. I stuffed the hat, then pinned the yellow hat to the inside of the green hat, the good side of the yellow hat touching the bad side (or inside) of the green hat. You can try it on to see if there's enough stuffing. I was satisfied, so I sewed through all the layers and flipped the ear flap down. Tada! Your hat now looks like this.
 |
| I was judging the size of the eye pattern pieces |


11. Then I handsewed the pupils onto the eyes, and the eyes onto the squid after being satisfied with their positions (which means trying on the hat and marking/remembering where the eyes are to go).
12. I then handsewed on some suckers for the two large tentacles, four on each tentacle.

13. For one of the tentacles, I switched one of the suckers for a little pink fish. I sewed a clip on button thing (I don't know what it's called. Anyone have an idea?) to the fish and an extra sucker, so the owner can switch the decorations up from time to time.
Here's the squid tentacle with the sucker, and with the fish.


14. Finally I handsewed some decorations on the squid's head. Circle barnacles are all the rage these days ;) And voila! Finished squid hat.

I made the hat using green antipill fleece and yellow blizzard fleece. The antipill fleece is more expensive, but fuzzier, and I wanted the squid to have two different textures. The black pupils/fish is made from felt, but the eyeball is made of blizzard fleece. The barnacles are also made of blizzard fleece, but that's because I didn't have yellow felt. I usually like to use felt for the details, because it's so much thinner and easier to handsew.
Some more pictures of the details, and the inside of the hat.


And that's that! Thanks for reading, happy sewing! Now go make your own squid hat! x)

FIRST POST- squid hat!
Hi everyone!
I revamped my entire blog. I originally meant for this blog to be a record or journal of some kind of my weight loss/six pack goal, with additional crafts and food on the side. But after wanting to share the process of making my crafts with my friends, I thought it would be better to dedicate this blog solely to arts and crafts. So here it is, the very first post featuring... *drumroll*
A SQUID HAT! :D
As you can see, the squid hat is large and eyecatching C: I made this for a friend, actually. We went to Six Flags and she really liked the squid hat they had there, but due to a stern Korean grandpa (LOL inside joke), we ended up only having enough time to ride the attractions and didn't get to play for the squid hat. So, i though I would make her one instead. A much cuter/funnier one at that ;D Hahaha so here it is, in all its green glory (my friend's favorite color is green, but I will definitely try a new color next time).
Designed as half plush, half hat, I have stuff the top half of the squid's head with polyfill stuffing to prevent it from sagging or flopping over. The stuffing is held in place by sewing a regular hat underneath the squid hat. I used Clearkid's hat tutorial and ear flaps tutorial to make this hat. The bottom yellow hat, which you can't see from these four pictures, was made from her hat tutorial but the green squid hat I made by using two triangle like pieces, and sewing the... triangle ear things (what do you call those anyways?) on. I also drew 10 tentacles (two long ones, 8 small ones) from the ear flaps pattern to get the shape I want. It worked out quite well! ^.^ The eyes were made using Coconut-lanes mochi tutorial. I may try simply gathering the edge of a single circle piece of fabric, tightening it, and sewing it to make the eyes next time.
Tutorial and process coming in the next post! Which I will write up... right now :)
I revamped my entire blog. I originally meant for this blog to be a record or journal of some kind of my weight loss/six pack goal, with additional crafts and food on the side. But after wanting to share the process of making my crafts with my friends, I thought it would be better to dedicate this blog solely to arts and crafts. So here it is, the very first post featuring... *drumroll*
A SQUID HAT! :D
 |
| Frontal sideways view |
 |
| Full view. The two longest tentacles go down to my waist! |
 |
| Sideways |
 | |
| From the back! |
As you can see, the squid hat is large and eyecatching C: I made this for a friend, actually. We went to Six Flags and she really liked the squid hat they had there, but due to a stern Korean grandpa (LOL inside joke), we ended up only having enough time to ride the attractions and didn't get to play for the squid hat. So, i though I would make her one instead. A much cuter/funnier one at that ;D Hahaha so here it is, in all its green glory (my friend's favorite color is green, but I will definitely try a new color next time).
Designed as half plush, half hat, I have stuff the top half of the squid's head with polyfill stuffing to prevent it from sagging or flopping over. The stuffing is held in place by sewing a regular hat underneath the squid hat. I used Clearkid's hat tutorial and ear flaps tutorial to make this hat. The bottom yellow hat, which you can't see from these four pictures, was made from her hat tutorial but the green squid hat I made by using two triangle like pieces, and sewing the... triangle ear things (what do you call those anyways?) on. I also drew 10 tentacles (two long ones, 8 small ones) from the ear flaps pattern to get the shape I want. It worked out quite well! ^.^ The eyes were made using Coconut-lanes mochi tutorial. I may try simply gathering the edge of a single circle piece of fabric, tightening it, and sewing it to make the eyes next time.
Tutorial and process coming in the next post! Which I will write up... right now :)
Subscribe to:
Posts (Atom)